If you’re considering a kitchen remodel with a splash of 1980s flair, you’re in for an exciting journey. Start by evaluating your current layout to guarantee it flows well, then set a budget that accommodates both your vision and potential surprises. The design should blend vibrant colors with modern functionality. Ready to transform your space? Let’s explore how each step can elevate your kitchen while keeping that nostalgic charm intact.
Key Takeaways
- Assess the current kitchen layout to improve functionality and optimize movement between cooking, cleaning, and storage areas.
- Set a realistic budget, accounting for materials, labor, and unexpected expenses to avoid financial stress.
- Choose a design style that blends modern elements with bold 1980s influences, using colors and patterns characteristic of the decade.
- Select durable materials and finishes that align with the chosen design style, ensuring all elements create a cohesive look.
- Plan the demolition carefully, using proper tools and safety measures, and address any structural issues discovered during the process.
Assessing Your Current Kitchen Layout
How well does your current kitchen layout serve your needs?
Consider the kitchen flow—does it allow easy movement between cooking, cleaning, and storage areas?
Assess your kitchen’s flow—ensure it facilitates smooth movement between cooking, cleaning, and storage zones for optimal efficiency.
Evaluate your storage solutions too. Are cabinets and drawers accessible, or are you constantly reaching for items?
Identify any bottlenecks where space feels cramped; maybe you need more counter space or a better placement for appliances.
Think about how you use your kitchen daily.
Prioritize functionality and efficiency, ensuring everything’s within reach.
A well-thought-out layout can transform your cooking experience, making meal prep enjoyable rather than a chore.
Take notes for your upcoming remodel!
Setting a Realistic Budget
When you’re setting up your kitchen remodel budget, start by determining the overall costs for materials, labor, and design.
Don’t forget to account for unexpected expenses that might pop up along the way, like plumbing or electrical updates.
A well-planned budget will keep your project on track and stress-free.
Determine Overall Costs
As you begin your 1980s kitchen remodel, setting a realistic budget is essential to avoid unexpected financial strain. Start with a cost estimation for each component, and conduct a budget analysis to prioritize your needs. This helps you allocate funds effectively and stay on track. Here’s a simple breakdown of potential expenses:
| Item | Estimated Cost |
|---|---|
| Cabinets | $2,000 |
| Countertops | $1,500 |
| Appliances | $3,000 |
| Flooring | $1,200 |
| Labor | $2,500 |
Account for Unexpected Expenses
While it’s easy to focus solely on the planned expenses for your kitchen remodel, it’s crucial to set aside a portion of your budget for unexpected costs.
These surprise costs can arise from hidden plumbing issues or outdated electrical systems. To safeguard your finances, incorporate budget buffers—typically 10-20% of your total budget.
This way, you won’t feel overwhelmed if unplanned expenses pop up. By preparing for the unexpected, you’ll keep your project on track and reduce stress.
Choosing a Design Style
There’s something special about capturing the essence of the 1980s in your kitchen remodel, and choosing the right design style is key.
You’ll want to blend modern aesthetics with vintage influences to create a space that feels both nostalgic and fresh. Consider colors like teal and mustard, alongside geometric patterns that define the decade.
Blend modern aesthetics with vintage influences for a nostalgic yet fresh kitchen, using colors like teal and mustard with geometric patterns.
Incorporate sleek lines and minimalistic cabinetry to reflect contemporary tastes while paying homage to that iconic era. Think about how lighting can enhance your design—bold pendant fixtures can tie it all together.
Ultimately, your style should resonate with you, merging history and modernity seamlessly.
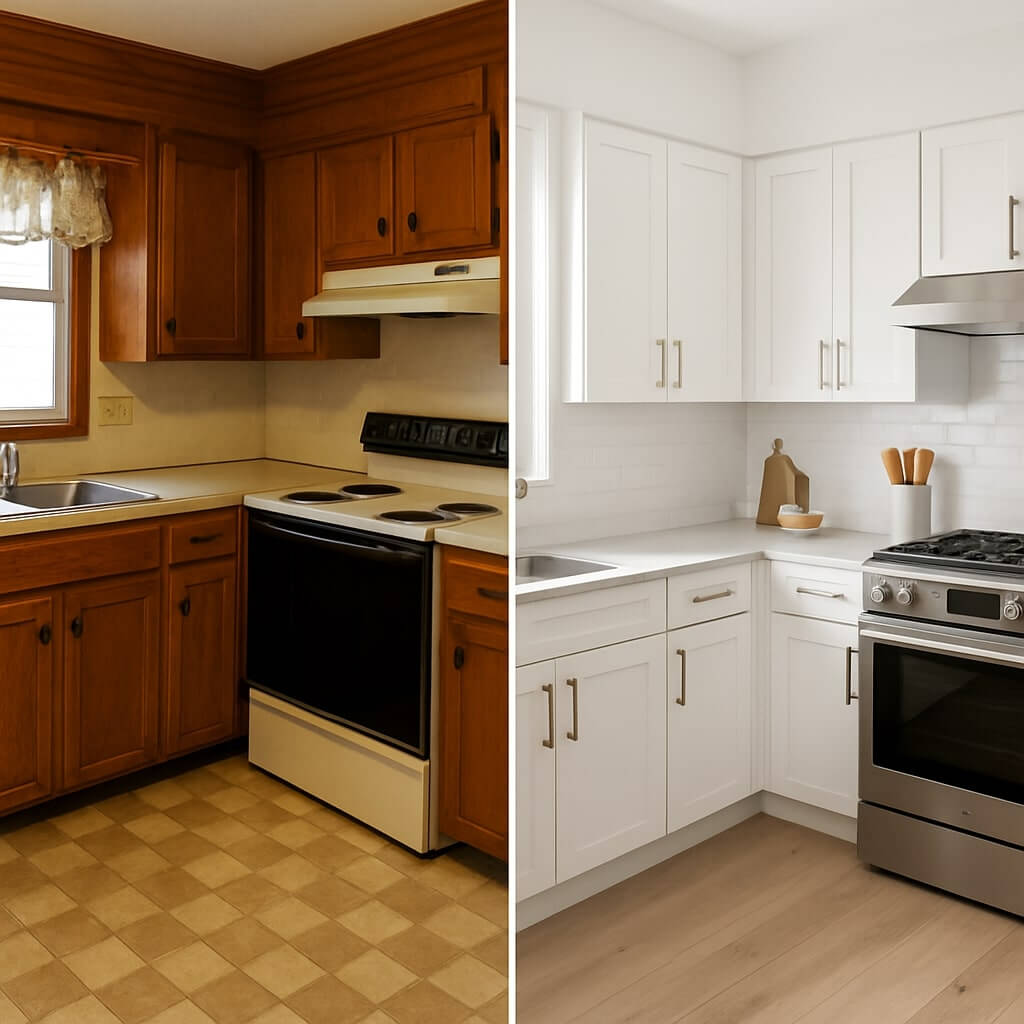
Selecting Materials and Finishes
Selecting the right materials and finishes can transform your 1980s kitchen remodel from ordinary to extraordinary.
Focus on material durability; opt for countertops like quartz or granite that withstand daily wear while adding elegance. When choosing cabinetry, consider wood or laminate that complements your design style.
Pay attention to finish compatibility; for instance, matte finishes work well with modern aesthetics, while glossy options suit traditional themes.
Don’t forget about flooring—ceramic tile or luxury vinyl can enhance both durability and visual appeal.
Demolition and Preparation
Before diving into your 1980s kitchen remodel, it’s important to tackle the demolition and preparation phase with a clear plan. Gather your demolition tools, like hammers and pry bars, and make sure you have safety precautions in place—gloves, goggles, and a dust mask are crucial. Start by removing fixtures and cabinets, working your way down to flooring.
| Task | Tools Needed |
|---|---|
| Remove cabinets | Hammer, Pry Bar |
| Take out appliances | Screwdriver, Wrench |
| Dismantle flooring | Crowbar, Utility Knife |
| Clean debris | Broom, Trash Bags |
With everything prepped, you’re ready for the next steps!
Installation and Construction
Now that you’ve tackled the demolition and preparation, it’s time to focus on installation and construction.
You’ll want to carefully plan each step, from laying down flooring to hanging cabinets, ensuring everything fits seamlessly.
Don’t forget the final touches, like trim and hardware, which can really elevate your 1980s kitchen remodel.
Demolition and Preparation Steps
Demolition and preparation are essential first steps in any kitchen remodel, especially when aiming for that iconic 1980s aesthetic.
Start by clearing the space of all appliances, cabinets, and countertops. Don’t forget to wear safety goggles and gloves to protect yourself during the process.
Once you’ve removed everything, check for any structural issues that need addressing. Proper waste disposal is vital; rent a dumpster to keep the area tidy and compliant with local regulations.
This organized approach not only streamlines your project but guarantees a safer environment as you move into the installation phase of your fabulous new kitchen.
Final Touches and Finishing
With the space cleared and any structural issues addressed, it’s time to focus on the final touches that will bring your 1980s kitchen remodel to life.
Start by installing your kitchen accessories, like stylish cabinet handles and modern faucets, which can dramatically elevate the look.
Next, add decor accents such as vibrant art pieces or funky retro-inspired dishware that reflect your personality.
Don’t forget to incorporate functional items like chic storage solutions that blend style and practicality.
Finish with soft lighting fixtures to create a warm ambiance, making your kitchen not just a cooking space, but a vibrant gathering spot.
Final Touches and Styling
As you wrap up your 1980s kitchen remodel, the final touches and styling play an essential role in bringing your vision to life.
Start by selecting kitchen accessories that complement your chosen color palette—think retro canisters or vibrant dishware. Incorporate decorative elements like vintage signs or framed prints to evoke nostalgia.
Don’t forget about lighting; pendant lights or a chic chandelier can add character and warmth.
Finally, consider greenery with potted herbs or plants for a fresh touch.
These details not only enhance the aesthetic but also make your kitchen feel inviting and personalized, completing your transformation beautifully.
Conclusion
By following these steps, you can transform your kitchen into a vibrant homage to the 1980s while ensuring it meets modern needs. Embrace bold colors and geometric patterns that reflect the era, but don’t forget the importance of practicality and durability. Remember, each decision you make enhances both the aesthetic and functionality of your space. With careful planning and a bit of creativity, your kitchen will not only look great but also serve you well for years to come.